To customise Lumina Leader 360 Portraits, select Manage Projects from the Practitioner Dashboard menu, and select the project you would like to customise. In your project, go to the Products tab. Click on the wrench icon located beside Lumina Leader 360.

You will be taken through a step-by-step Customisation Wizard. We will go through each of the steps here.
Step 1 Anonymity Settings
This step allows you to set Anonymity Settings. There are a few options to choose from. The following explains the different settings in more detail:
Anonymous – no grouping
This means that rater feedback is anonymous and there is no minimum requirement of feedback raters within each group.
Anonymous – groups of two
This anonymity setting requires that there is a minimum of two feedback raters within each group to enable the default grouping to be identified e.g. at least two raters need to be assigned to the ‘Peer’ group for this group to be displayed. If fewer than two feedback raters are within each of the default groups, then that rater will appear in the group ‘Other’ instead.
Anonymous – groups of three
This anonymity setting requires that there is a minimum of three feedback raters assigned within each group to enable the default grouping to be identified e.g. at least three raters need to be in the ‘Peer’ group for this group to be displayed. If fewer than three feedback raters are represented within each of the default groups then those raters will appear in the group ‘Other’ instead.
Not anonymous – show source of feedback
This setting will group the feedback raters as per the selected default grouping (e.g. peer, boss etc.) regardless of how many feedback raters are in each group - there is no minimum requirement. Their names will also be displayed in the portrait. Their name will also be displayed beside any written comments they provide.
Boss never anonymous
By selecting this function, the Boss will never be anonymous regardless of the other anonymity settings you have selected.

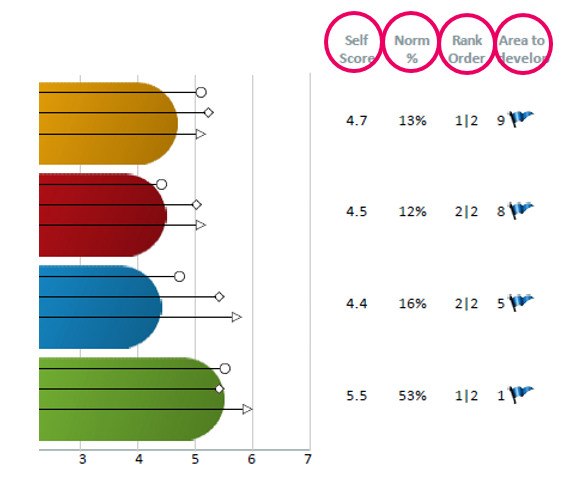
You can also choose to enable four components that feature in the Lumina Leader 360 Portrait: ‘Self Score’, Norm %, ‘Rank Order’ and ‘Area to develop’. By default these are enabled, you can select to disable these components.
Self Score The Self Score is the score the self-assessor has given themselves out of 7, with no reference to a norm group.
Norm % This is the self-assessor’s score as a percentage relative to other leaders in Lumina Learning’s normative database.
Rank Order: This shows how the raters score of the self-assessor compares to the others in your project.
Area to develop: The flag indicates areas for personal growth with the number of times other raters marked the question, competency or domain for development.
You will also find a description of these terms at the beginning of the Leader and Leader 360 Portraits.
This is how these four components appear in the portrait.
Step 2 Group Labels
You can choose to re-label the feedback groups that appear in the portrait. The default group labels are Boss, Peers, Staff and Other. To save the new labels, select the Save icon.

Step 3 Page Selection
This step allows you to choose pages you wish to include/exclude from the portrait. To move the pages between the Currently Included and the Currently Excluded columns, select the page you want and it will move over to the other column.

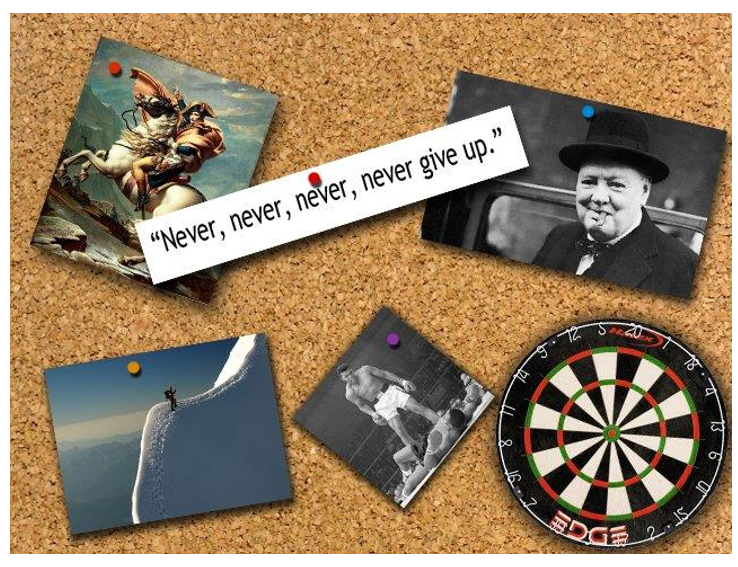
Step 4 Corkboards
You can choose to display Corkboards. See below for an image of the corkboard as it appears in the portrait.

Step 5 Select Questionnaire length and composition
You can customise the length and composition of the Leader Self and Leader 360 Rater questionnaires. The default is 96 questions with 3 Effective and 3 Overextended questions but you can select reduced length options as well as configure alternative compositions of Effective and Overextended questions.
If you select a reduced length Leader Self questionnaire, you can apply the same length (and composition) to the Leader 360 Rater version. You also have the option to make the 360 Rater questionnaire shorter than the Leader Self version. In this instance, the Leader 360 Portrait will just show the self-assessed scores for any questions that were not included in the Rater version.

Step 6 The customisation is now complete! Close the window or select Back to Project.

Step 6 Regenerate
These changes will be present on all portraits you download in that project in the future or until you make further customisations.
However, to activate these changes in existing portraits in that project, you will need to Regenerate the portrait(s) before downloading again.
Regeneration for Lumina Leader 360 is slightly different to other products.
To Regenerate the Lumina Leader 360 Portrait to include any customisations:
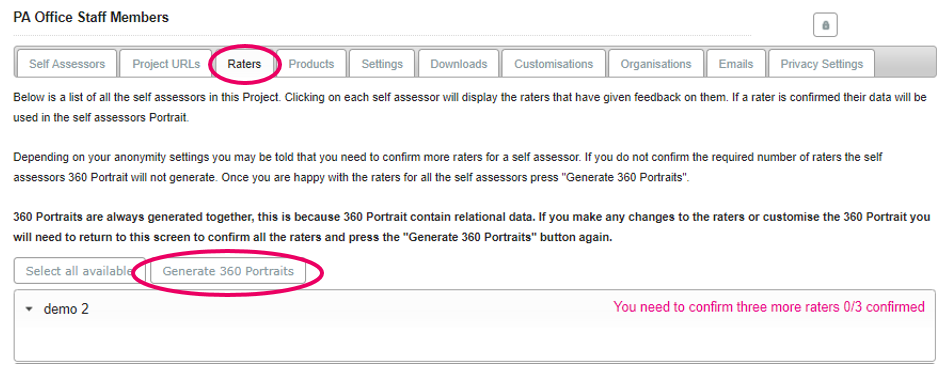
Step 1 Go to the Raters tab. Under the individuals’ name, confirm the raters whose feedback you wish to include in the regenerated portrait by selecting the ‘tick box’ beside their name. Then, click Generate 360 Portraits.
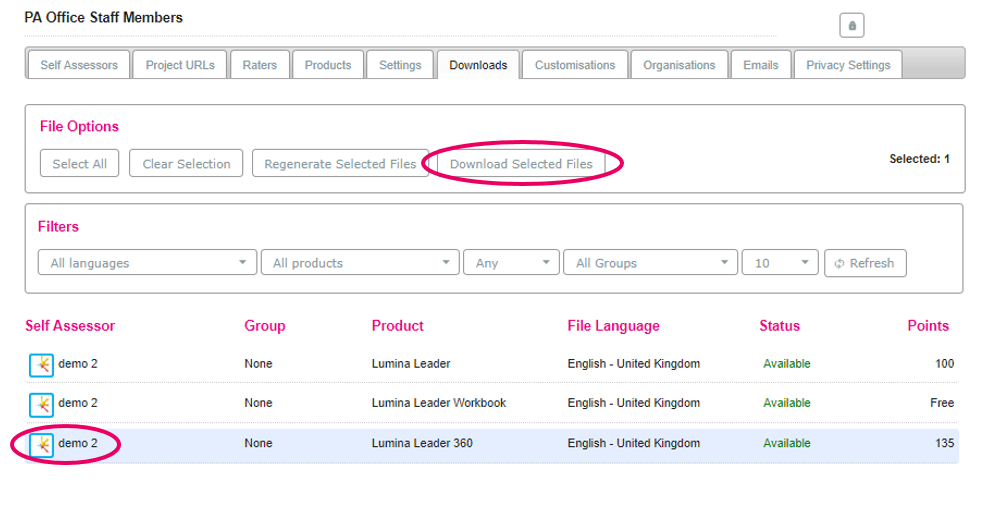
Step 2 Go to the Downloads tab and select the self-assessors whose portraits you wish to download and select Download Selected Files. The downloaded portrait(s) will contain the customisations you have included.
Other relevant links: